Part 2: Configure AWS Services (Cognito, DynamoDB, S3, IAM) using the AWS Console.
In the previous post I introduced the AmazonSwiftStarter app with a simulated backend. Now we need to set up the AWS services for the app, and replace the simulated backend with real AWS logic. In this post you will set up the AWS services. At the end of this post you will have your own configured AWS backend, ready to be used with the app. In part 3 you will connect the app with the backend, and let everything work together smoothly.
Disclaimer: My goal is to share my AWS “adventures” to help others, and to learn from your feedback. AWS can be pretty overwhelming for beginners. Therefore I like to keep things as simple as possible. My most important goal is to research the features I need for my commercial app, and prototype them in this demo app. The demo app will definitely not be of production quality!
Tutorial overview
Part 1: Introduction to the AmazonSwiftStarter demo app and a pattern for backend abstraction
Part 2: Configure AWS Services (Cognito, DynamoDB, S3, IAM) using the AWS Console
Part 3: Run AmazonSwiftStarter with the configured AWS services using the AWS iOS SDK
I will start with an overview of the services that the app uses. Next I will explain how to configure them, one by one.
Services Overview
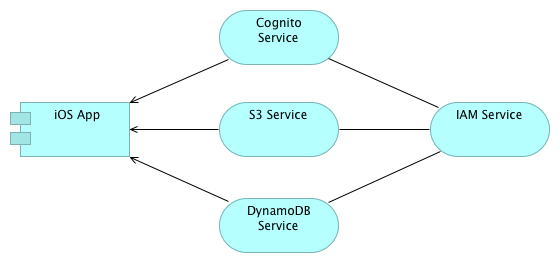
The app will use the following services: Cognito, DynamoDB, and S3. Behind the scenes the IAM service will play an important role in securing access to AWS resources.
Let’s take a short look at what these services do:
- Cognito: An identity service that lets you create unique identifiers for your users through a number of public login providers (like Amazon, Facebook, Twitter etc.). It also supports unauthenticated users. In our app we will use unauthenticated users.
- DynamoDB: a fully managed NoSQL database service. In our app we will use it to store data.
- S3: Simple Storage Service, offers secure and highly scalable cloud storage. Our app uses this service to store user profile photos.
- IAM: Identity and Access Management securely controls access to AWS services and resources for the app users. It can be configured to create roles, groups, and uses permissions to allow and deny app users access to AWS resources. In our app we will configure how app users are allowed to access data in DynamoDB and S3.
The image below shows how these services work together (abstracting from a lot of detail). The arrow represents a “Used By” relationship. The other lines (without arrowhead) represent an unspecified association. Cognito, S3 and DynamoDB are directly used by the app. IAM will take care of identity management and access control behind the scenes.
On a side note: The image was made with Archi, an open source tool for Enterprise Architecture Modelling in the Archimate language. I have worked for a company specialised in Enterprise Architecture. They develop their own (closed source) tools. For this company I have developed an iPad editor for Archimate.
To put this architecture in perspective you might want to take a look at Amazon’s mobile backend reference architecture (pdf). I will definitely explore other key features of this architecture, like the Api Gateway and Lambda. I consider Lambda as a viable alternative for Parse Cloudcode.
Now that we have an overview of our high level architecture we can start setting it up. This is done by configuration via the AWS console. This tutorial assumes that you already have created an account on AWS.
Setup Cognito
Our app will use Cognito for anonymous sign in.
Go to the AWS Cognito dashboard, click New Identity Pool and enter the data as shown below. Don’t forget to check Enable access to unauthenticated identities. This is important for our app, we only have unauthenticated identities.
The identity pool is where the identities of the app users are stored. Every time a new user signs in to the app a new identity is added to this pool.
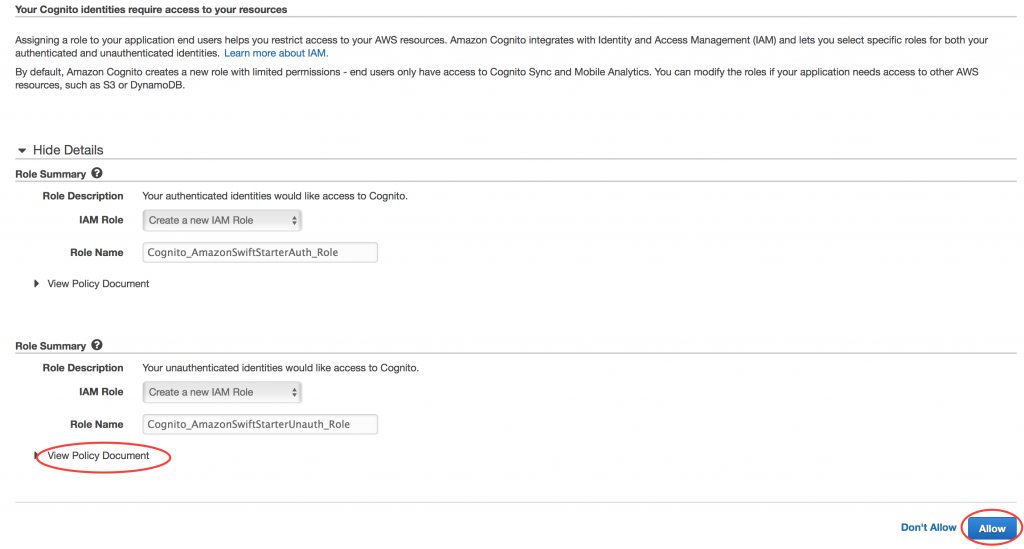
Click CreatePool, and on the next screen click View Details. You’ll see that 2 roles already have been created, Cognito_AmazonSwiftStarterAuth_Role and Cognito_AmazonSwiftStarterUnauth_Role. For this app we are only interested in Cognito_AmazonSwiftStarterUnauth_Role. This role has some default permissions, which do not include access to DynamoDB or S3. We will set that up later. If you are interested you can click View Policy Document, to get a first impression of a policy document.
Click Allow. You’ll see a page with sample code for Java. Ignore this, and in the top right corner of this page click Edit Identity Pool. Here you will find the Identity pool ID generated by Cognito (in the image I have used the placeholder YOUR_COGNITO_IDENTITY_POOL_ID). Copy your Identity pool ID string and keep it somewhere. You will need it later when configuring the app.
We’re done setting up Cognito. There’s more configuration work ahead.
Setup DynamoDB
We will use DynamoDB to store the data of our app. First go to the DynamoDB dashboard and click Create Table
You’ll see a screen similar to the one below. You have to enter a name for your table. This table will store the User data, so choose something meaningful. I will refer to your table name as YOUR_DYNAMO_DB_USERS_TABLE. DynamoDB table names must be unique within an AWS region. In the Primary Key field add the data exactly as shown in the image (userId of type String).
You have to realise that DynamoDB automatically distributes your data across table partitions, which are stored on multiple servers. It uses the primary key (or more precise a hash of the primary key) to determine the partitioning details. I consider this out of scope for this blog post. I’d rather focus on integrating all services and making this simple app work before exploring all details. For production apps it is important, for reasons of scalability, performance and costs. Anyway, if you are interested in the DynamoDB details, you might want to take a look at the DynamoDB documentation.
Click Create, and you will be taken to the next screen (this might take a minute or so). It presents an overview of your DynamoDB tables.
You need to remember the ARN (Amazon Resource Name) of your table (shown as YOUR_DYNAMODB_USERS_TABLE_ARN). We will need that later, when configuring access policies.
You’re done configuring DynamoDB!
Just one more thing that is good to know. Pricing of DynamoDB works a bit different than you might expect. You are charged based on provisioned capacity for reads and writes.You need to provide an initial estimation, and you are charged accordingly. The free tier does apply to a certain maximum.
Setup S3
Our app will use S3 to store profile photos. Go to the S3 dashboard and click Create Bucket. Enter a name for the bucket. A bucket name must be globally unique. In this blog I will refer to the bucket name as YOUR_S3BUCKET_USERS.
After adding the bucket name click Create
You’re done configuring S3! This was the easiest one!
In the next step you will need the ARN of the bucket. The full ARN of a bucket is determined by its bucket name, prefixed with some aditional characters as shown here:
YOUR_S3BUCKET_USERS_ARN = arn:aws:s3:::YOUR_S3BUCKET_USERS
Setup Access Permissions on IAM
We have configured DynamoDB and S3, but we have not stated anywhere what kind of rights our app users have to access these services. We can solve this by configuring access permissions on AWS IAM for the unauthenticated user role.
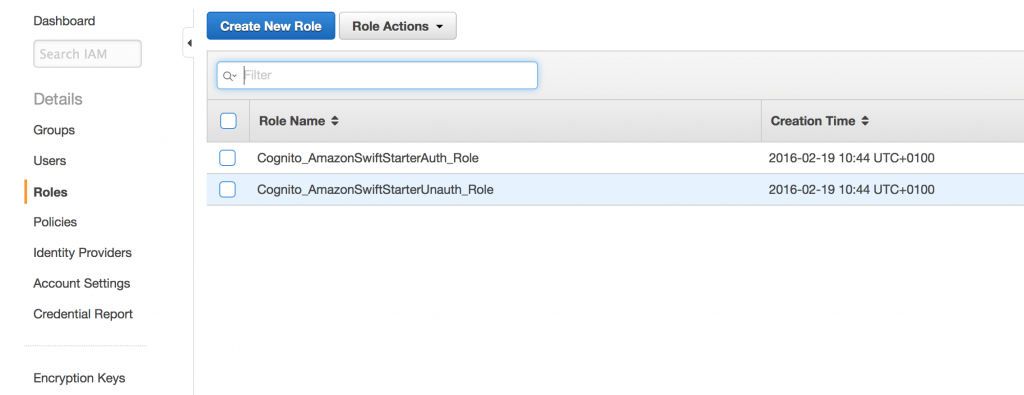
Go to the IAM dashboard and click Roles (on the left). The following screen will appear:
These roles have been created for you while setting up Cognito. Now click Cognito_AmazonSwiftStarterUnauth_Role. This is the role of the unauthenticated user.
On the policy near the bottom of the screen click Edit Policy
Replace the existing policy with the policy that is shown below.
Replace the placeholders that start with YOUR_* by the values that you wrote down earlier. In the policy, behind the YOUR_S3BUCKET_USERS_ARN is a *. Be careful not to delete it accidentally while replacing the placeholder.
This policy allows users with the role Cognito_AmazonSwiftStarterUnauth_Role access to your DynamoDB table and your S3 bucket. I have not given creation of secure policy statements a high priority in my research yet. My primary goal was to make the app work for this blog. I succeeded, but with this policy the app security is insufficient for production code. I will dive into that topic some other time. If you are interested you can take a look at the Overview of IAM Policies document.
|
1 2 3 4 5 6 7 8 9 10 11 12 13 14 15 16 17 18 19 20 21 22 23 24 25 26 27 28 29 30 31 32 33 34 35 |
{ "Version": "2012-10-17", "Statement": [ { "Effect": "Allow", "Action": [ "mobileanalytics:PutEvents", "cognito-sync:*" ], "Resource": [ "*" ] }, { "Effect": "Allow", "Action": [ "dynamodb:DeleteItem", "dynamodb:GetItem", "dynamodb:PutItem", "dynamodb:Scan", "dynamodb:Query", "dynamodb:UpdateItem", "dynamodb:BatchWriteItem" ], "Resource": [ "YOUR_DYNAMODB_USERS_TABLE_ARN" ] }, { "Action": "s3:*", "Effect": "Allow", "Resource": "YOUR_S3BUCKET_USERS_ARN*" } ] } |
Click Validate Policy (a syntax check) and Apply Policy
You have now configured access policies for the services that you have set up.
Conclusion
We’re done. The server configuration is ready. You have created a highly scalable backend that is waiting to be called by the app. In the next post we are going to use it! We will replace the simulated backend by logic that talks to the AWS services you just configured. At the end of part 3 we will have a working app!


7 Comments on “Exploring AWS as a backend for a Swift app (2)”
Hey Peter,
First of thank you so much for saving all of us out here that suffer through AWS’s dismal documentation. I’ve never seen a company that has so much out there but doesn’t really address our needs. I am an iOS Developer and have yet been able to fully understand how to ‘update’ an attribute in a single item (user record) on a table within DynamoDB.
Do I need to read the whole record into memory and THEN update the singlular attribute and do a write back to DynamoDB? I have found no code examples that show an ‘update’.
Thank you in advance for answering this.
Tim
Hi Tim, DynamoDB has support for updating attributes without reading the record into memory first. I have no experience with this via the iOS SDK, but I once applied it via the javascript SDK.
The relevant documentation:
DynamoDB UpdateItem Api
iOS sdk AWSDynamoDBUpdateItemInput
I do not have a code snippet using the iOS SDK but the javascript snippet below might give you an idea how to deal with this. It updates the location and lastActiveAt attribute of a user record.
      var params = {};

      params.TableName = _usersTableName;

      params.Key = { "userId": _userId };

      params.ExpressionAttributeNames = { '#loc': "location" };

      params.ConditionExpression = "attribute_exists(userId)";

      if (_location === undefined) {

        params.UpdateExpression = "REMOVE #loc SET lastActiveAt = :laa";

        params.ExpressionAttributeValues = { ':laa': new Date().toISOString() };

      } else {

        params.UpdateExpression = "SET #loc = :loc, lastActiveAt = :laa";

        params.ExpressionAttributeValues = { ':loc': _location, ':laa': new Date().toISOString() };

      }

      params.ReturnValues = "ALL_NEW";

      _docClient.update(params, function (err, data) {

        if (err) {
}
else {
}
});
I do have the same problem as Steven Rhey Balan
I’m having an error in EditProfileViewController, it stops in viewdidload/ preconditionFailure(“CurrentUser must be available”)
UpdateItem on resource: arn:aws:dynamodb:eu-west-1 xxxxxxxxxxxxxxx:table/T_Table
My Region is usEast1
my table is T_Table
Any advises please
Thank you
Can you check if the user is correctly created after the first app launch?
Something else I noticed: You have specified your region as usEast1. Your table is deployed in eu-west-1. Maybe the error is related to the different regions? I did not test the scenario of AWS resources in different regions.
Hope this helps.
I’m having an error in EditProfileViewController, it stops in viewdidload/ preconditionFailure(“CurrentUser must be available”)
Please advice. Thank You.
Which version are you using?
Hi Peter,
So far I understand every step you took and it’s been interesting. I have also downloaded your example swift app en researched your code, it really helped me understand it.
I cannot wait to see the third part…
Thanks
Richard